WP-Invoice: Single Page Checkout
Welcome to the WP-Invoice: Single Page Checkout wiki!
Single Page Checkout (SPC) is Add-on for WP-Invoice that makes it easy to create stand-alone checkout forms on your site. That form can contain a list of Predefined Line Items of your choice, or open items (custom amount entry). Other features include processing fee calculation, custom user information capture, multiple items, and more. Processed payments are visible on the WP-Invoice overview screen on the back-end, alongside regular invoices.
How It Works
The Single Page Checkout form works with the [wpi_checkout] shortcode. It can be added on any post or page, giving you the ability to create list of Predefined Line Items. The client viewing that page will be able proceed to checkout and buy the products and services of his choice directly from that page.
Creating Predefined Line Items
Single Page Checkout forms can consist of (but are not limited to) Predefined Line Items, which are default products or services than you create once and can use multiple times in SPC lists or invoices. Consider them as your most common products / services for invoicing or Single Page Checkout forms. We will not cover the specifics on Predefined Line Items here, you can see the complete guide on the help page for Predefined Line Items, where you can see examples and understand them better.

An example: The logo designer
To understand the concept of the Single Page Checkout form better, let’s assume, as an example, that you are a logo designer. You are interested in creating a list so that your clients can easily choose from and purchase your corporate branding services, a logo design, a business card design and a stationery design.
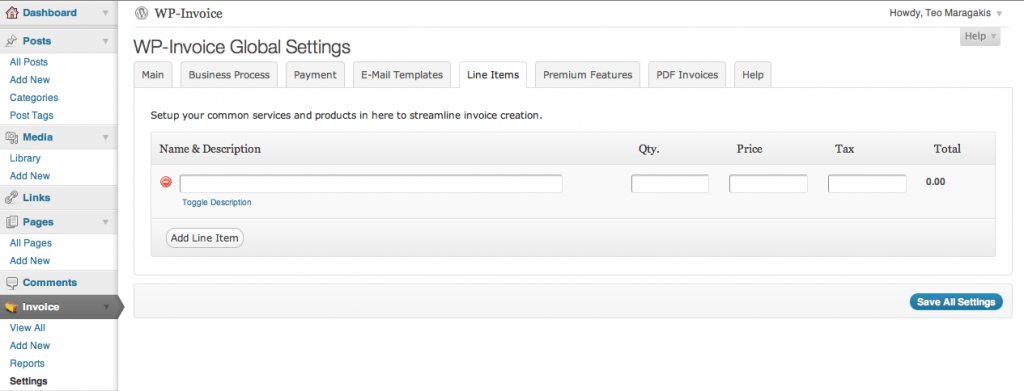
For the needs of this example, we will assume that the professional has a fixed price for each item on that list. Single Page Checkout forms have fixed quantities, prices and tax by nature. The logic here is “they see it, they buy it”. To begin creating a Single Page Checkout form, we go to the WP-Invoice Settings page (Invoice → Settings) and click the “Predefined Line Items” tab. Here we can see an interface that easily allows us to create and edit predefined products and services. That interface may include a couple of dummy items (depending on the version of WP-Invoice you have installed. Feel free to keep, delete or edit these items, you can use them on your Single Page Checkout form if you wish. In this example we will assume that the list of items is empty.
Creating the items
Each Predefined Line Item has five input fields for Name, Description, Quantity, Price and Tax. The Description field’s visibility can be toggled with the “Toggle Description” link underneath the Name field. Each item also includes a dynamic label that will show you the total value of that item, calculated by the quantity, price and tax you set.
We will assume a tax of 20% for each of the services listed above, a price of 30 (currency depends on the setting under the Payment tab) and a quantity of one. You can change these values at will. We begin by filling in the first item on our list, so the result should be something like on this image.
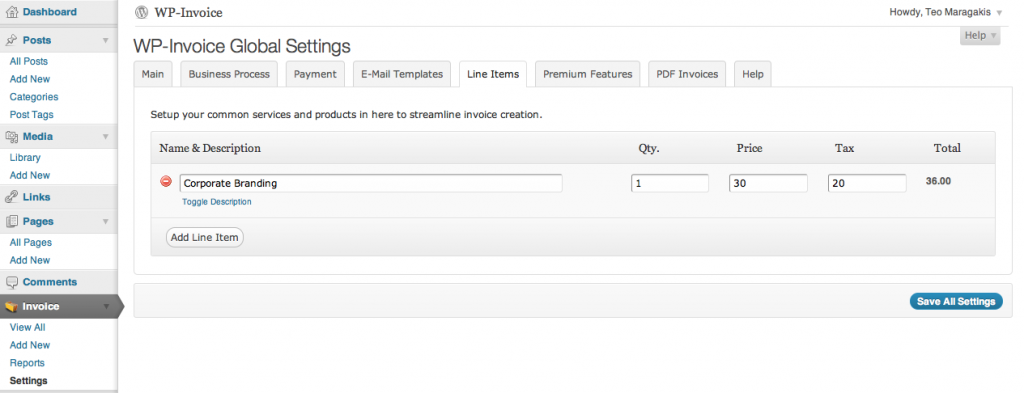
Next we click on the “Add Line Item” button and repeat until all four services are on the list. When we are done we click on the “Save All Settings” button. We should have something like this (I have added some text on the descriptions too):

Note: Even if you change the Description, Quantity, Price and Tax fields of a Predefined Line Item, the shortcode you create will not be broken, as long as you keep the Name field the same.
We are almost done! All we have to do now is to create a shortcode for our Single Page Checkout form.
Understanding the shortcode
A shortcode is a short piece of text that you can insert in any post or page, that will be replaced by some kind of user interface, form or content.
A shortcode is a WordPress-specific code that lets you do nifty things with very little effort. Shortcodes can embed files or create objects that would normally require lots of complicated, ugly code in just one line. Shortcode = shortcut.
A shortcode uses a command (with or without parameters) in square brackets (to make the WordPress installation it is a shortcode and not normal text. The shortcode for the Single Page Checkout form uses both a command and parameters and to be able to show our list on our website, we have to properly form the shortcode. We start with typing the command for Single Page Checkout which is wpi_checkout, enclosed in square brackets, without any spaces.
Next we have to add the attributes for the title of the list, items we want to include on it etc. Take a look at the shortcode cheatsheet below, to understand the various attributes that can be used with the Single Page Checkout shortcode.
Assuming you have read and understood the shortcode attributes, let’s create our shortcode for the four services we have created:
[wpi_checkout item='Corporate Branding,Logo Design,Business Card Design,Stationery Design']
Now let’s add a title so we can figure out who bought what at the backend.
[wpi_checkout item='Corporate Branding,Logo Design,Business Card Design,Stationery Design' title='Design Package']
Let’s assume we have created a page with our Terms and Conditions and it has an ID of 15. We add it to the shortcode:
[wpi_checkout item='Corporate Branding,Logo Design,Business Card Design,Stationery Design' title='Design Package' terms_page_id='15']
Finally, let’s have the users pay with Authorize.Net by force (note that we must have credit card payments enabled and all the gateway settings set on the Payments Settings tab and in the MerchantPlus.com and Authorize.Net Settings area) and add a 5% fee for credit card processing:
[wpi_checkout item='Corporate Branding,Logo Design,Business Card Design,Stationery Design' title='Design Package' terms_page_id='15' gateways=wpi_authorize fee=5]
We are done! All you need to do now is create a new page (or use an existing one) and paste your complete shortcode in it. To see all the advanced options the shortcode gives you, take a look at the cheatsheet on the right.
Shortcode Cheatsheet
- item (required): A comma-separated list of Predefined Line Item names (or a single one). Attention: If you are using Predefined Line Items, the item names on the list must appear exactly as they appear on the Predefined Line Items tab (spaces and everything).
- custom_amount (not required): A “true” or “false” value to set if the amount field will be open on the form (clients will be able to set their payment amount).
- customer_information (not required): Fields you may want to add to the form. They will be saved as invoice meta data. SPC will add additional fields into the invoice after the payment is complete, with the values the user entered during the checkout process.
- terms_page_id (not required): If you want to make users to agree with some ‘Terms and Conditions’ before buying, you should add this attribute and insert your Terms and Conditions page ID. After that, a checkbox to make the user agree with your terms will appear on the front-end.
- title (not required): The title attribute is used to set some name to the Single Page Checkout transaction. This name will appear as the name of the automatically created invoice, after the payment process in the backend.
- fee (not required): Percentual value of extra fee applied to item values
- gateways (not required): CSV list of gateways available for payment. Available values will be present dynamically due to installed gateways. Every venue should be turned on in Payment settings. If gateways are not presented in this option, all globally available venues will be used. Acceptable values: ‘wpi_authorize’, ‘wpi_paypal’, ‘wpi_usa_epay’, ‘wpi_paypal_pro’, ‘wpi_mijireh_checkout’
- uncheck_items (not required, Developers only): Disables the checkout items. Only use this if you are using some sort of JS script to enable them back on.
- template (not required, Developers only): The name of the custom page template you want to use to display the SPC form.
- callback_function (not required, Developers only): A custom function that will be called after the purchase is complete. Developers can use this to call their own functions after the client has successfully completed a purchase. (can be used only in PayPal or Authorise.net payment gateways)
Note: Attributes that contain words or terms separated by spaces (Predefined Line Item names for example) must be enclosed in single quotes. See examples in this page.
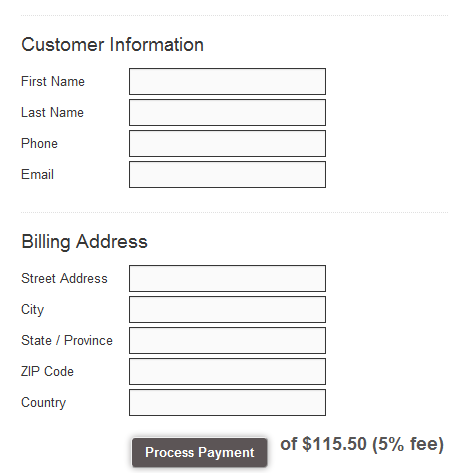
Sample Output